Ingredients
Ingredients are the raw materials you buy — flour, butter, chocolate, packaging, and so on. You enter each one once, then reuse it across as many products as you like. Good ingredient data is the foundation of accurate costs and, most importantly, of every label you produce.
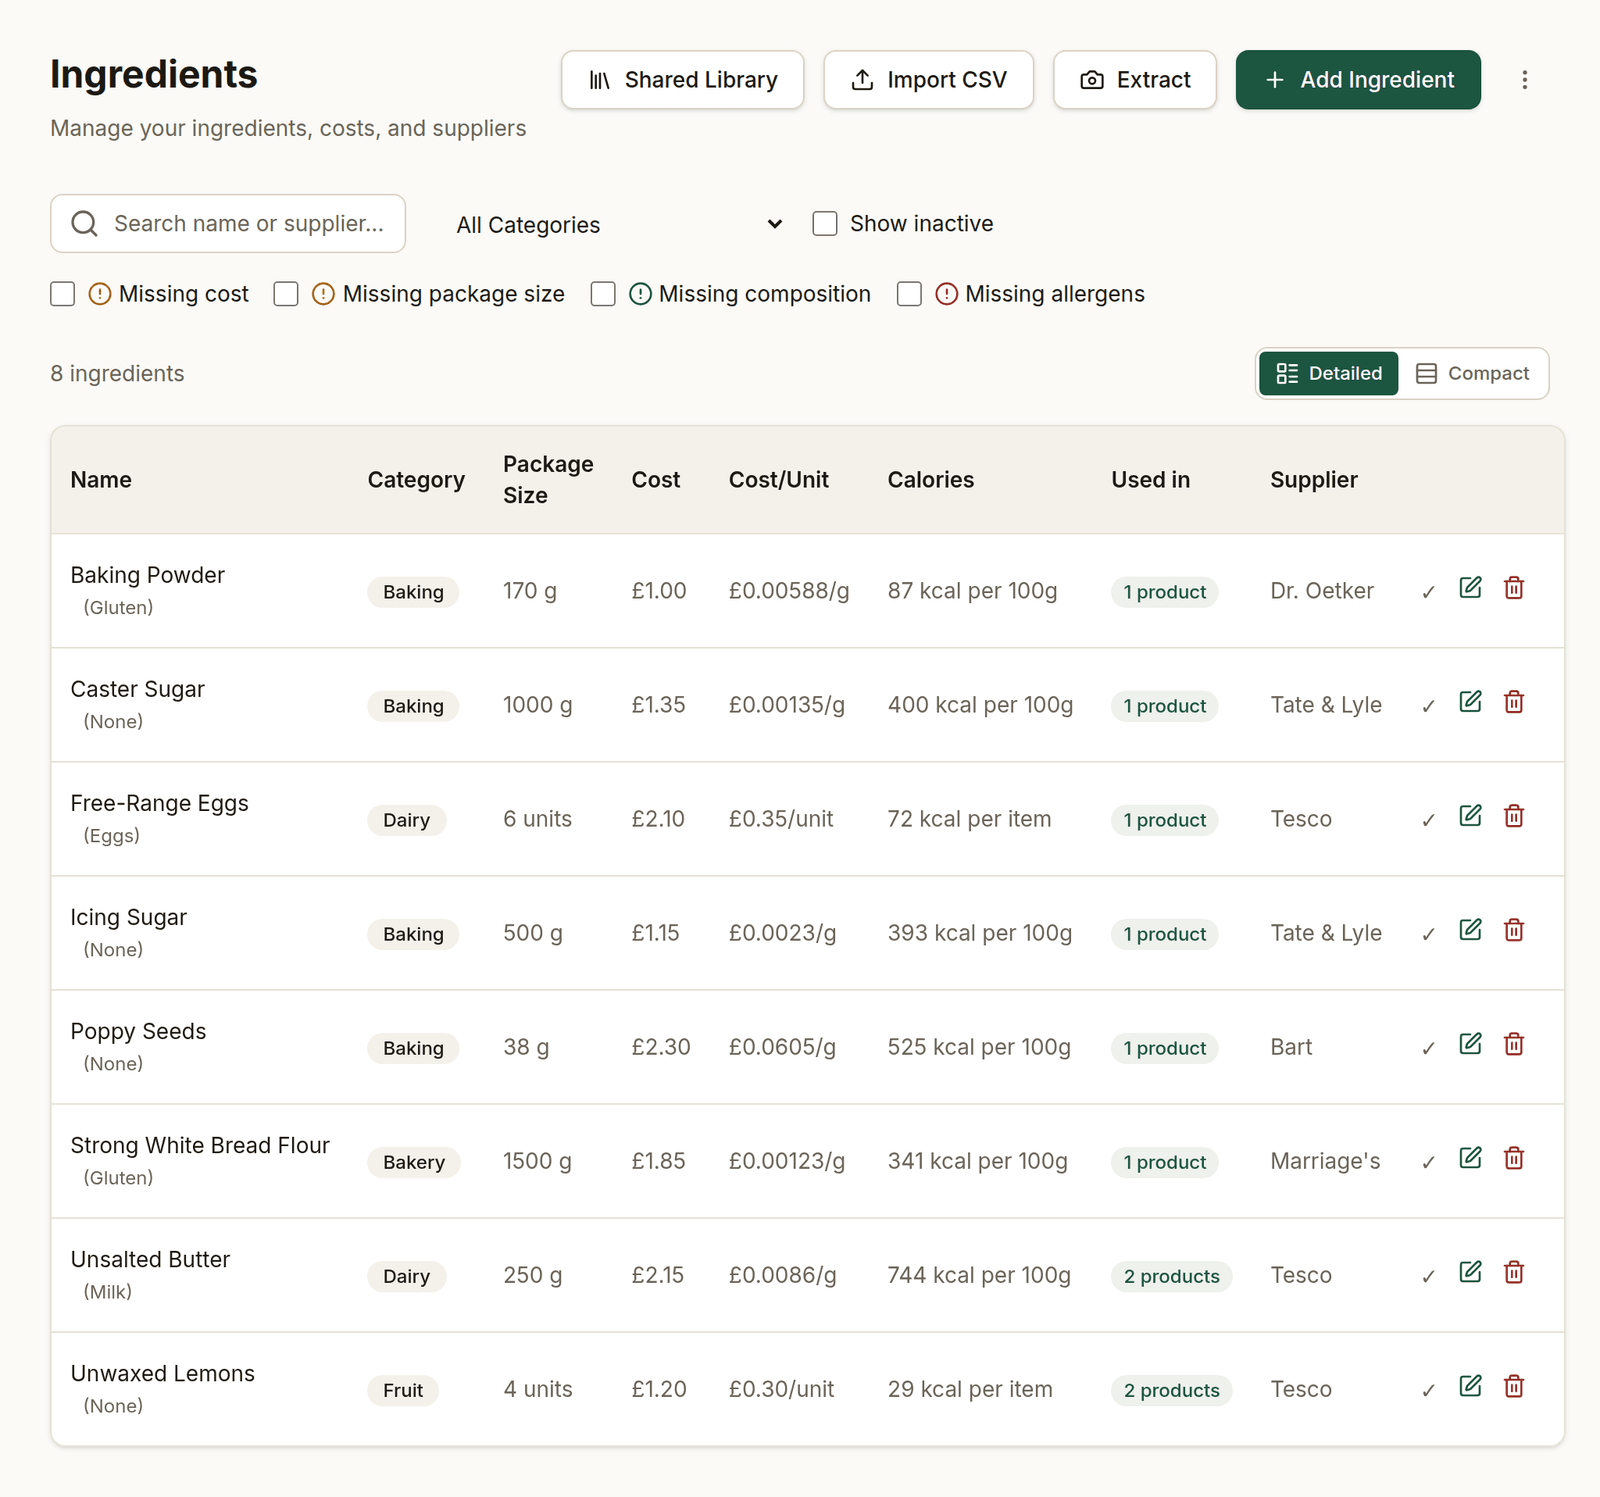
Your ingredients list. Each row shows the pack you buy and the unit cost worked out from it.
Adding an ingredient
Go to Ingredients in the sidebar and click Add Ingredient. Fill in:
- Name — e.g. "Plain flour". You can reuse a name: the same ingredient from a different supplier, or in a different pack size, is a separate row with its own cost. What can't be repeated is the whole combination of name, supplier and pack size — that would just be the same thing entered twice.
- Category — Ingredient, Packaging, or Decoration.
- Unit — how you measure it (g, ml, or units).
- Package size and Cost — what one pack contains, and what that whole pack costs: a 1000 g bag at £1.20, or a box of 400 lids at £130. Together these let the app work out your cost per gram (or per item) automatically, and every recipe is charged only the share it actually uses — one lid out of that box costs 33p, not £130.
- Supplier — optional, but it's what tells two same-named ingredients apart in your list and in the recipe picker, where it shows under the name.
- Calories — the energy figure printed on the nutrition panel, per 100 g or 100 ml (or per item for anything measured in units, like an egg). Unlike cost, this is not a per-pack number. Fill it in and your products total it up the same way they total cost, giving you calories per item. Leave it blank if you don't know it — a recipe will then say its total is partial rather than quietly leaving that ingredient's energy out.
Calories are for your own planning, not for printing. They're worked out from the raw ingredients, so they can't be used as a nutrition declaration — that has to be measured on the finished, baked product and covers seven figures, not one.
The two fields that matter for labels
- Composition — what the ingredient is actually made of, e.g.
Wheat Flour, Calcium Carbonate, Iron, Niacin. For a single raw ingredient this may just be its own name. - Allergens — detected automatically from the composition as you type,
based on the UK's 14 major allergens. The detection is a
helper, not a decision: check it against the actual packaging and edit it if
anything is missing or wrong. You can always type your own comma-separated
list, e.g.
Gluten, Milk.
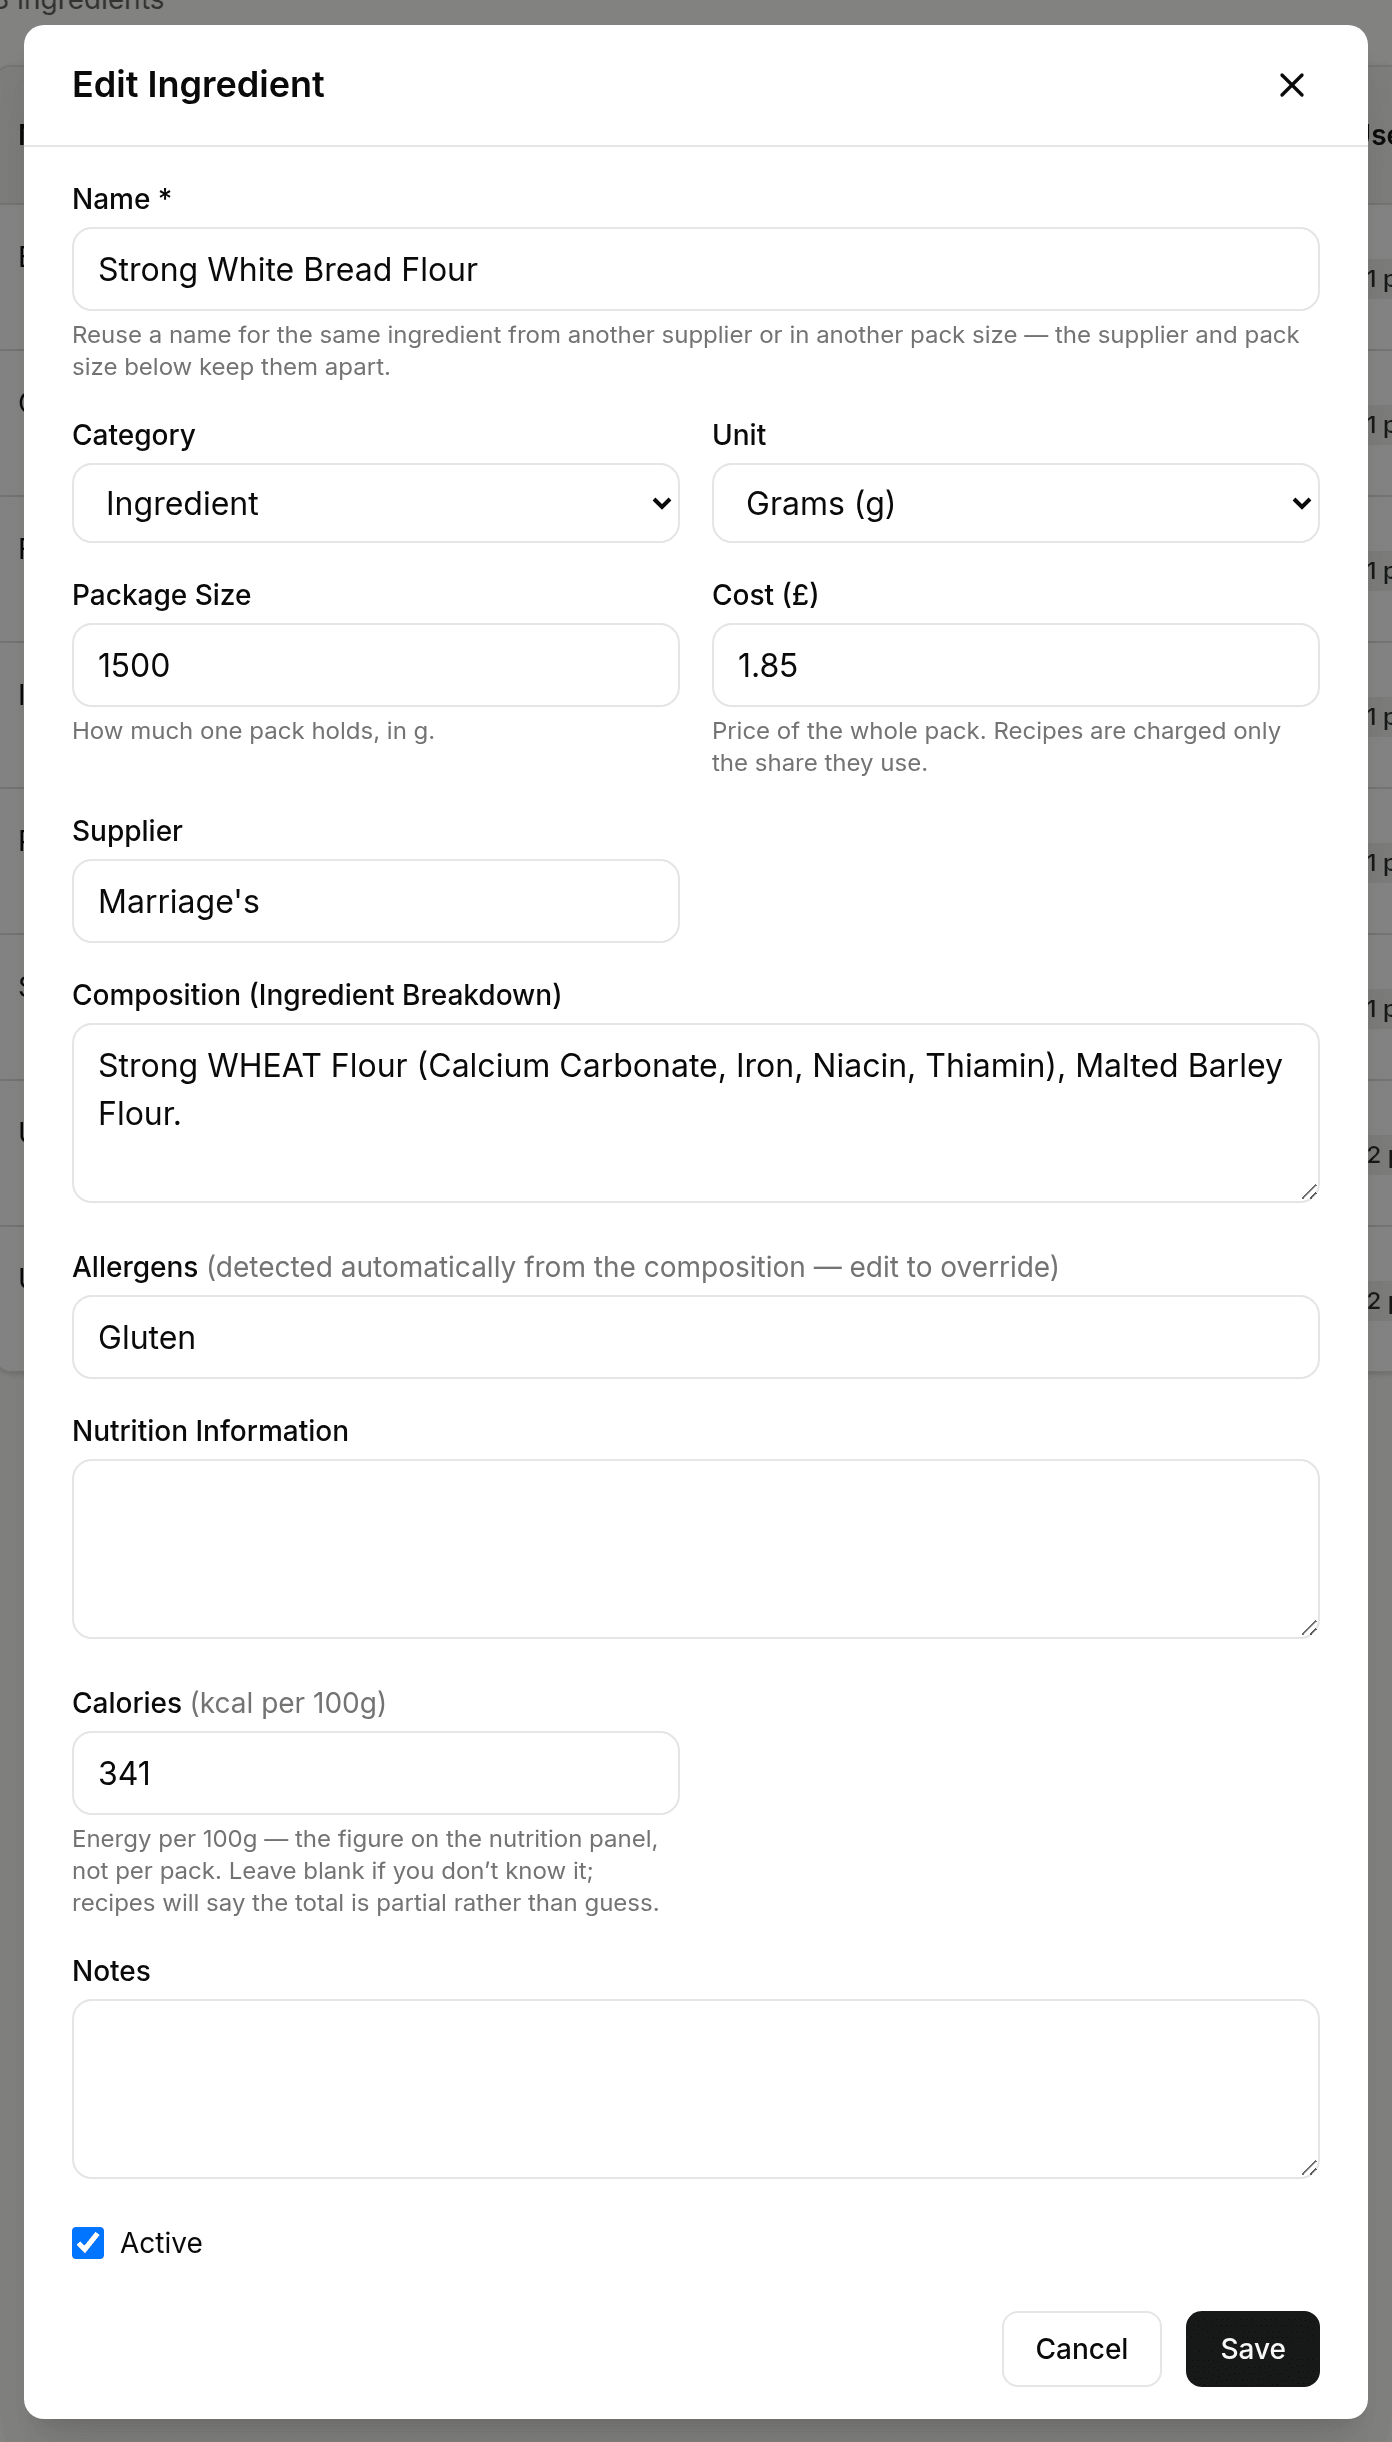
Composition drives the allergen detection — allergens appear as you type.
Why this matters: a label cannot be generated for a product until every ingredient in it has both of these filled in. If you skip them now, you'll be sent back to add them before you can label anything that uses this ingredient — including products that reach it through a sub-recipe. It's quickest to do it up front.
Ingredients in the Packaging category skip both fields — packaging isn't eaten, so it never appears on a label. Its cost still counts. See Allergens.
If an ingredient has no allergens, say so
Leaving the allergens field blank does not mean "no allergens". It means the question hasn't been answered yet, and BakeCheck will not print a label that turns a blank field into a "contains no allergens" claim.
So for something like caster sugar, type None in the allergens field, or click
Declare no allergens underneath it. The ingredient then counts as declared and
stops blocking labels. See Allergens for the full picture.
Faster ways to add ingredients
- Import CSV — bulk-import a spreadsheet of ingredients. Use the
Download template link in the import window to get a correctly-formatted
starter CSV, fill in your ingredients, then upload it. Include the
Allergens column — write the allergens, or
Nonewhere there are none. Rows imported without it are left undeclared, and the products that use them can't be labelled until you go back and fill them in. (An import never overwrites an allergen declaration you've already made in the app.) - Extract from a photo — snap a supplier receipt or packet and let the app read the details.
- Shared Library — import from the platform-wide catalogue. Imported ingredients stay linked: their name, allergens, and composition are kept in sync for you, while cost and supplier remain yours to edit. You'll see an Update available badge when the catalogue changes.
Keeping data healthy
The ingredients list flags anything incomplete — missing cost, missing package size, missing composition, and missing allergens. The Missing allergens and Missing composition filters let you pull up everything that needs attention in one go, which is the quickest way to unblock a batch of labels.
Missing cost and package size affect your costings only. Missing composition or allergens stop labels being generated at all.
The Used in column shows how many of your live products use each ingredient — hover it to see which ones. It tells you how far a price or allergen change will ripple, and an ingredient showing Unused is one you can safely delete.
Switch the list to Compact (top right of the list) for a one-line-per-ingredient table. It's the quickest way to run your eye down the cost and cost-per-unit columns and spot a price that's been typed in wrong — a pack cost entered in pence, say, or a package size out by a factor of ten. Your choice is remembered.
Marking an ingredient inactive, or deleting it
- Inactive — untick Active when you stop buying something. It stays on the recipes that already use it, so their costs and labels keep working, but it drops out of the pickers for new recipes and stops counting towards your plan.
- Delete — permanent, and only possible when no live product uses the ingredient. If something does, you'll be told to mark it inactive instead.
Full detail, including how this affects your plan allowance, is in Your plan, archiving, and deleting.
Next: once your ingredients are in, create a product.